The image I chose to work with for this demostration is an old one. It was shot from the balcony of the second floor in the Old Arkansas Statehouse. And after working with it to put this post
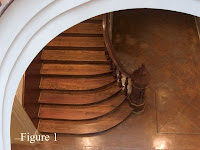
together it occurred to me that I could have picked a better subject. This one has more things going on with it than I would have liked, but at the same time the lack of color in the final image simplifies things a great deal. Hopefully the idea will still come across clearly enough. (figure 1--Original image)
The first thing I knew I wanted to do was crop, but because of the distortions there were no straight lines available to draw a crop from. Or at least not one that I liked. So the first thing I did was select the entire image and use the Photoshop Transform
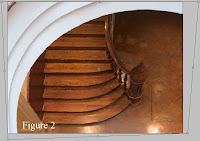
command (Edit >> Transform >> Distort) to bend the image and give me some straight lines to work with. (figure 2 -- Transformed)
OK. Thats better. At least now I some straight lines to work with. And in the process I removed an unwanted line as well (the rear section of tiling).
Next, I cropped the image to get the composition I desired.
Now is where the fun stuff comes in. The image was mostly balanced the way I wanted at this
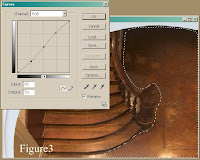
point, but the color wasn't working for me at all. I was seeing the image in monotone. So knowing that I was going this direction I made what was to be the first of many selections to manipulate the overall tones. (Figure 3 -- Crop and Initial Selection, Please forgive me for covering both with one image!)
As you can see, I made a selection of the tiling with the Lasso tool, and modified it with a mild tone curve. Next, and this has become one of my favorite tricks, I used the Invert command (Select >> Invert) to select the other half of the image. Then I modify it with a reverse of the previous curve. The trick is making good selections that Feather enough and/or follow existing lines of light and shadow so that you don't notice the transition zones.
The basic technique is nothing new, of course. It's really just the digital equivalent of dodging and burning using selections made with the Lasso tool. But with digital you can also use your selections to do lot more than dodge and burn. If I want to manipulate the color in an area, or the saturation, the sharpness.... whatever, it's all right there, just waiting to be adjusted.
Now, you could easily do something similar and make it even better (less destructive to the image) by working in layers. I typically choose not to because I dislike layers, but that's just a personal preference thing.
For the final image I did several more things. So many that I don't recall them all. But it includes
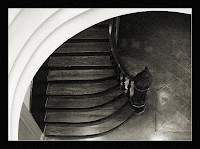
everything mentioned above, along with a conversion to black and white that was later given a sepia tone. I also added a bit of grain.
From the original to the finished piece the individual changes were very subtle, but when taken as a whole they tend to add up.